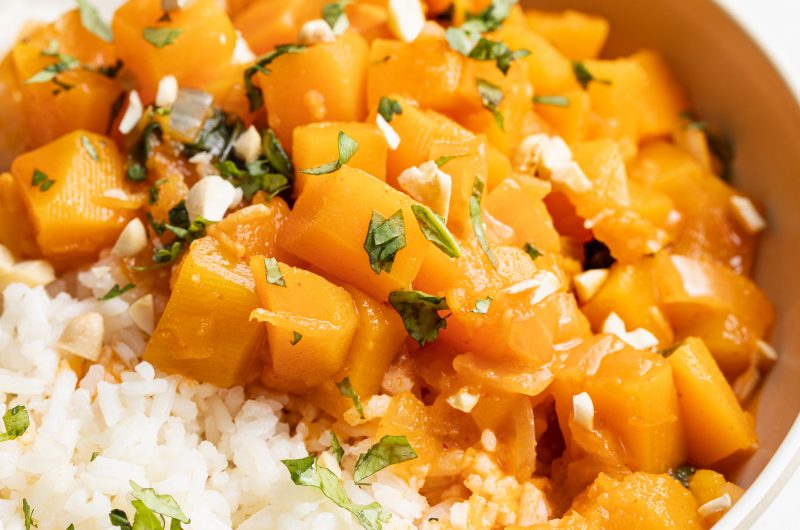
Tag

salt

Browsing

Full of savory flavors and made with 11 simple ingredients, this gluten-free stuffing recipe is a classic dish you can make for the upcoming holidays to share with family and friends!

Gluten-Free Stuffing

A Thanksgiving meal isn’t complete without the stuffing! I love the savory flavors of onion, celery, sage, rosemary and chicken stock all mixed together with cubes of toasted bread. With the holidays coming up, you’re going to want a quick, delicious gluten-free stuffing recipe on hand. This one will not disappoint. It’s not only gluten-free but it’s also dairy-free, ensuring even those with allergies can enjoy this timeless dish.

MAIN INGREDIENTS NEEDED

  • Gluten-Free Bread

  • Butter

  • Yellow Onion

  • Celery

  • Garlic Cloves

  • Fresh Sage, Parsley & Rosemary

  • Salt

  • Chicken/Vegetable Stock

  • Eggs

TIPS TO FOLLOW WHEN MAKING This Classic Gluten-Free Thanksgiving Stuffing

  • I used Canyon Bakehouse Gluten-Free Mountain White bread in this recipe and it cooked up beautifully!

  • I kept this stuffing recipe classic, but you could easily add sautéed mushrooms, cranberries, apples, or a little sausage to it if you’d like. Here’s one variation you can try if you want to add a little sweet to this savory dish.

    • Cranberry-Apple Stuffing: When cooking onions and celery, add 2 peeled, cored and diced apples, and 1 cup dried cranberries to the aromatics when you add the stock.
  • To make this dairy-free, all you have to do is replace the butter with vegan butter!

Gluten-Free Stuffing (With Dairy-Free Option)

5 from 1 vote
Recipe by Samantha Course: SidesCuisine: AmericanDifficulty: Medium
Servings

4

servings
Prep time

20

minutes
Cooking time

1

hour 
Total time

1

hour 

20

minutes

Full of savory flavors and made with 11 simple ingredients, this gluten-free stuffing recipe is a classic Thanksgiving dish you can make for the upcoming holidays to share with family and friends!

Ingredients

  • 15 Ounce Loaf (cut into cubes)

  • 1/2 Cup Butter

  • 1 Large Yellow Onion (chopped)

  • 1 Cup Celery (chopped)

  • 5 Whole Garlic Cloves (minced)

  • 1/2 Cup Fresh Parsley (chopped)

  • 3 Tablespoons Fresh Rosemary (chopped)

  • 3 Tablespoons Fresh Sage (chopped)

  • 2 Teaspoons Salt

  • 2 Cups Chicken or Vegetable Stock (divided)

  • 2 Whole Eggs

Directions

  • Preheat oven to 350° Fahrenheit.
  • Spread bread cubes into an even layer on a baking sheet and bake for 30 minutes, tossing halfway through.
  • Melt butter in a small saucepan over medium heat, then add in the onion, celery, and garlic. Sauté until soft, about 8 minutes.
  • Add toasted bread cubes, onion mixture, fresh parsley, sage, rosemary, salt, and 1 cup of stock to a large bowl – toss to combine.
  • In a separate bowl, whisk together the remaining one cup of stock and eggs. Pour egg mixture into bread mixture and stir until just combined.
  • Transfer to a 9×13-inch baking dish and bake for 45-50 minutes or until golden brown.

Recipe Video

Did you make this recipe?

Share it and tag @samdoesherbest on Instagram!

Like this recipe?

Follow us @samdoesherbest on Pinterest

More Healthy Recipes

Miso-Glazed Salmon with Coconut Rice is a delicious gluten-free seafood dish filled with healthy nutrients and packed with savory flavors. You’ll be amazed at how easy and quick it is to make (under 30 minutes)!

Miso-Glazed Salmon with Coconut Rice

MAIN INGREDIENTS NEEDED TO MAKE Miso-Glazed Salmon with Coconut Rice

  • Miso Paste

  • Soy Sauce – Use tamari for gluten-free.

  • Rice Vinegar

  • Honey

  • Salmon Fillets – With the skin on.

  • Rice – Jasmine or long grain white rice.

  • Coconut Milk

  • Water – Plain or coconut water.

  • Salt

Tips on Making Miso-Glazed Salmon with Coconut Rice

  • The Miso Glaze – To make the glaze you’ll need miso paste, some soy sauce, honey and a bit of rice vinegar. Miso paste (fermented soy bean paste) is very savory and salty. The thing to keep in mind here is that miso paste comes in all sorts of colors (white, yellow, red). Generally, the darker the paste, the stronger the flavor, so choose based on your taste preferences.

  • Rice Vinegar – You can use lemon juice, lime juice, or white vinegar in place of the rice wine vinegar in this recipe.

  • Make it Paleo – For paleo, use coconut aminos instead of soy sauce, and omit the honey since coconut aminos contain a bit of sweetness.

Miso-Glazed Salmon with Coconut Rice

4 from 4 votes
Recipe by Samantha Course: MainCuisine: AmericanDifficulty: Easy
Servings

4

servings
Prep time

20

minutes
Cooking time

25

minutes
Total time

45

minutes

Miso-Glazed Salmon with Coconut Rice is a delicious gluten-free seafood dish filled with healthy nutrients and packed with savory flavors. You’ll be amazed at how easy and quick it is to make (under 30 minutes)!

Ingredients

  • For the Miso Salmon:
  • 2 Tablespoons Miso Paste

  • 2 Tablespoons Soy Sauce (or tamari)

  • 1 Tablespoon Rice Vinegar

  • 1 Tablespoon Honey

  • 4 Whole Salmon Fillets (Skin-On)

  • For the Coconut Rice:
  • 2 Cups Jasmine or Long Grain White Rice

  • 1 Can Coconut Milk

  • 1 1/4th Cups Coconut Water or Plain Water

  • 1 Pinch Salt

Directions

  • Mix together the miso paste, soy sauce, rice vinegar, and honey in a small bowl.
  • Pat salmon dry with a paper towel, place on a baking sheet then pour miso mixture over top of each fillet. Let salmon marinate at room temperature for 20 minutes.
  • Place salmon in the oven at high broil for for 4-5 minutes, or until a thermometer inserted into the thickest part of the salmon reads 125° Fahrenheit.
  • Make the coconut rice by adding all ingredients to a saucepan over medium heat, bring to a boil before reducing to a gentle simmer and covering with lid. Cook for 15-20 minutes or until all liquid has been absorbed, remove from heat and fluff rice with a fork before serving.

Recipe Video

Notes

  • Add in cooked veggies for an even healthier meal!
  • Storage: Properly stored, cooked salmon will last for 3 to 4 days in the refrigerator. Use an airtight container.
  • To Reheat: Put the fish on a rimmed baking sheet and warm it a 275°F oven for about 15 minutes, until it reaches an internal temperature of 125°F to 130°F. 

Did you make this recipe?

Share it and tag @samdoesherbest on Instagram!

Like this recipe?

Follow us @samdoesherbest on Pinterest

MORE HEALTHY RECIPES

This easy gluten-free turkey salad recipe is made with mayo, celery stalk, green onion, Dijon mustard and salt, perfect for a simple and healthy leftover lunch meal. Have it as a salad or turn it into a turkey sandwich!

Turkey Salad Sandwich

There always seems to be too much turkey at Thanksgiving. I never know what to do with all the leftovers, so I try to come up with yummy recipes to put it to good use. One of the easiest ways to use leftover turkey is to turn it into a turkey salad that can easily be made into a sandwich. Perfect for a quick and filling work day lunch!

MAIN INGREDIENTS NEEDED TO MAKE Turkey Salad

  • Turkey – 4 cups of cooked turkey chopped up

  • Mayonnaise

  • Celery Stalk & Green Onion – You’ll just need 1 each chopped.

  • Dijon Mustard – 2 teaspoons full should do the trick.

  • Salt

  • Dill Pickle – optional, but is a great addition.

Ways To Serve

  • Buns – Try it on a sweet Hawaiian roll or pretzel bun!

  • Whole Wheat Bread – The classic way.

  • Lettuce Wraps – Try crisp lettuce cups. Simple and easy!

  • Crackers – A spoonful on a cracker makes a perfect appetizer.

  • Croissant

Turkey Salad (Gluten-Free & Dairy-Free)

5 from 3 votes
Recipe by Samantha Course: LunchCuisine: AmericanDifficulty: Easy
Servings

4

servings
Prep time

10

minutes
Cooking time

5

minutes
Total time

15

minutes

This easy gluten-free turkey salad recipe is made with mayo, celery stalk, green onion, Dijon mustard and salt for a simple and healthy leftover meal. Have it as a salad or turn it into a turkey sandwich!

Ingredients

  • 4 cups cooked turkey

  • 1/2 cup mayonnaise

  • 1 whole celery stalk, chopped

  • 1 whole green onion, chopped

  • 2 teaspoons Dijon mustard

  • 1 teaspoon salt

  • fresh chopped dill, optional

Directions

  • Add all ingredients to a large bowl and mix together until combined.
  • Taste turkey salad and adjust any seasoning as desired, best served cold.

Recipe Video

Notes

  • Storage: Turkey salad should last for 3 – 4 days in the fridge in an airtight container.

Did you make this recipe?

Share it and tag @samdoesherbest on Instagram!

Like this recipe?

Follow us @samdoesherbest on Pinterest

MORE Healthy RECIPES

Sautéed in olive oil, garlic, Italian seasoning, salt, and red pepper, this easy-to-make Italian Green Beans recipe is a perfect side dish to any meal and is ready to eat in just 5 minutes!

Italian Green Beans

Are green beans good for you?

Yep! Green beans are a great option for a side dish because they are low calories, packed full of Vitamin C and K, fiber and folate.

Should I use frozen, canned or fresh green beans?

Green beans is widely available fresh, frozen or canned. So, which do you choose? Well, of course fresh is the best option and the one I recommend and use in this green beans recipe. There’s nothing better! But, if you can’t get your hands on those, frozen is your next best bet. Usually limp, overcooked and colorless, canned green beans are just sad to look at, let alone eat, so that should be your last option.

How Should I Select Fresh Green Beans?

Fresh green beans should be firm and should snap when bent in half. You’ll want to trim off the tough ends before cooking them.

MAIN INGREDIENTS NEEDED TO MAKE THESE Italian Green Beans

  • Green Beans – I suggest grabbing some fresh green beans, but frozen works too.

  • Olive Oil

  • Garlic Cloves

  • Italian Seasoning

  • Salt

  • Red Pepper Flakes

Italian Green Beans

5 from 1 vote
Recipe by Samantha Course: SidesCuisine: AmericanDifficulty: Easy
Servings

4

servings
Prep time

5

minutes
Cooking time

5

minutes
Total time

10

minutes

Sautéed in olive oil, garlic, Italian seasoning, salt, and red pepper, this easy-to-make Italian Green Beans recipe is a perfect side dish to any meal and is ready to eat in just 5 minutes!

Ingredients

  • 12 ounces frozen or fresh green beans

  • 2 tablespoons olive oil

  • 3-4 garlic cloves, minced

  • 1 teaspoon Italian seasoning

  • 1/2 teaspoon salt

  • Pinch of crushed red pepper flakes

Directions

  • Cook green beans according to package instructions.
  • Heat olive oil in a large skillet over medium heat, then add in the garlic, Italian seasoning, salt, and red pepper. 
  • Sauté for 1 minute before adding in the green beans, cook for 2-3 minutes and serve warm.

Recipe Video

Notes

  • Storage: Properly stored, cooked green beans will last for 3 to 5 days in the refrigerator. Make sure to use an airtight container.

Did you make this recipe?

Share it and tag @samdoesherbest on Instagram!

Like this recipe?

Follow us @samdoesherbest on Pinterest

More Quick Recipes

These homemade gluten-free soft pretzels are chewy, soft, flavorful, and so delicious! It’s a fun and easy snack recipe you can make for the whole family. Dip it in cheese sauce, sprinkle it with salt, or drizzle chocolate right on top, the choice is yours. Either way, you won’t be able to eat just one!

Soft pretzels are a classic snack that might seem hard to make, but they’re not hard at all! With simple, healthy ingredients, this gluten-free soft pretzels recipe is fun to make and doesn’t take long. For people with gluten sensitivities, these pretzels are the perfect way to enjoy a classic snack.

MAIN INGREDIENTS NEEDED TO MAKE THESE Gluten-Free Soft Pretzels

  • All-Purpose Flour – (I’ve used Bob’s Red Mill All-purpose gluten-free flour with great success!)

  • Active Dry Yeast

  • Brown Sugar

  • Salt

  • Xanthan Gum

  • Baking Powder

  • Water

  • Butter (non-dairy)

  • Egg & Egg Yolk

TIPS ON MAKING Gluten-Free Soft Pretzels

Salt is the usual go-to when it comes to pretzel toppings. However, you can use all different kinds of toppings to make it sweeter or more to your liking.

  • For an almond toppinguse Honey Roasted Almonds. Chop roasted almonds into small bits, brush freshly baked pretzels with melted butter, then roll or sprinkle in almonds.

  • For a cinnamon sugar topping, mix 1/2 tsp of cinnamon with 1/4 cup granulated sugar and melt 1 Tbsp of butter in a small bowl. Brush the freshly baked pretzels with melted butter, then roll in cinnamon sugar. 

  • For an extra burst of savory flavors, you can use King Arthur Flour’s Everything Bagel Topping, which is a combination of salt, poppy seeds, sesame seeds, dried onion, and garlic. 

Gluten-Free Soft Pretzels

0 from 0 votes
Recipe by Samantha Course: SnacksCuisine: AmericanDifficulty: Easy, Medium
Servings

10

servings
Prep time

30

minutes
Cooking time

30

minutes
Calories

300

kcal
Total time

1

hour 

These homemade gluten-free soft pretzels are chewy, soft, flavorful, and so delicious! It’s a fun and easy snack recipe you can make for the whole family. Dip it in cheese sauce, sprinkle it with salt, or drizzle chocolate right on top, the choice is yours. Either way, you won’t be able to eat just one!

Ingredients

  • For the dough:
  • 3 cups all purpose gluten-free flour

  • 2 ¼ teaspoons active dry yeast

  • ¼ cup brown sugar

  • 2 teaspoons salt

  • 1 teaspoon xanthan gum

  • ½ teaspoon baking powder

  • 1 cup warm water

  • ¼ cup non-dairy butter, melted

  • 1 egg, at room temperature

  • For cooking:
  • 10 cups water

  • 2/3 cup baking soda

  • For egg wash:
  • 1 egg yolk

  • 1 tablespoon water

  • For topping:
  • Salt

Directions

  • Mix together the gluten-free flour, yeast, brown sugar, salt, xanthan gum, and baking powder in a large bowl. 
  • Form a well in the center of the flour mixture then pour the warm water, melted butter, and egg into the well. Whisk to combine while slowly incorporating the dry ingredients into the wet ingredients. 
  • Transfer dough to a floured surface and knead until smooth, then shape into a ball and transfer to a lightly greased bowl. Cover bowl with towel, leave to proof in a warm place for an hour or until doubled in size.
  • Preheat oven to 450° Fahrenheit and line a baking sheet with parchment paper.
  • Place dough on a floured surface and separate into 10 equal balls. Warm each ball between the palm of your hands for a few seconds, then roll into an 18-inch rope before shaping each rope into a pretzel. For help shaping, follow this tutorial.
  • Cover pretzels with a towel while you bring 10 cups water to a boil in a large pot. Once boiling, add in the baking soda.
  • Once foam subsides, carefully drop one pretzel at a time into the boiling water for just 30 seconds. Remove from water and arrange on a baking sheet. 
  • Whisk together the egg yolk and one tablespoon of water then brush egg wash over top of each pretzel before sprinkling with salt if you’d like.
  • Bake pretzels for 20-25 minutes or until lightly golden brown, then leave to cool on baking sheet for 10 minutes before transferring to a wire cooling rack to cool rest of the way.

Recipe Video

Notes

  • Xanthan gum provides a pleasant chewiness to the pretzels. If omitted or substituted, it may affect the softness and texture of the pretzels.
  • Storage: These taste best when eaten the same day, but if you want to store them, wrap them individually in plastic wrap and keep in the fridge for up to 2 days or in the freezer for 1 month.

Did you make this recipe?

Share it and tag @samdoesherbest on Instagram!

Like this recipe?

Follow us @samdoesherbest on Pinterest

OTHER HEALTHY SNACK RECIPES